進行最終編輯
必要操作:若要進行最終編輯並完成手動轉移程序,您將須進行以下內容:
這是手動移動我的 WordPress 網站系列的最終步驟。
您即將完成手動移動 WordPress 網站的程序!透過 FTP 應用程式連線至新網站並編輯 wp-config.php 檔案,藉此為網站設定檔進行最終編輯。您將需更新表格前綴,並指定新的「Siteurl」及「Home」,變更這些內容後,您的網站便能連線到新的資料庫。
- 透過 FTP 應用程式連線到新的 WordPress 網站。(需要使用 FTP 連線的相關協助嗎?)
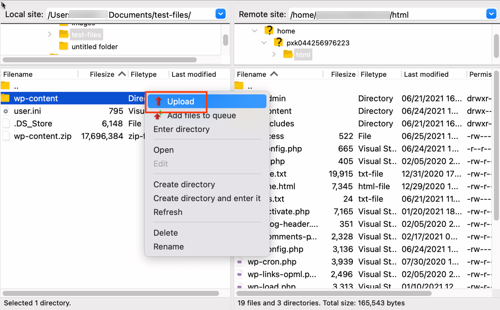
- 在 FileZilla「遠端站台」處找到「
wp-config.php」並按下右鍵開啟選單,然後點選「檢視/編輯」。
- 在編輯器中找到
$table_prefix,然後將內容編輯為您在匯入資料庫步驟中所匯入的正確資料庫前綴。在下面的範例中,原始資料表的前綴是'wp_9666d08kk3_'。注意:請記下資料庫前綴。資料庫前綴會附加在表格名稱上 (舉例來說,如果您看到以下資料庫表格:wp_3f_options、wp_3f_ posts、wp_3f_postmeta 等等,表示資料庫前綴是 wp_3f_)。 注意:Managed Hosting for WordPress 正在轉移到新版平台。若是由新平台託管的網站,則 table_prefix 位於另外的設定檔內,並非預設的 wp-config.php。若要自訂 table_prefix,您可以開啟 wp-config.php 並前往 CUSTOM Variable DEFINITIONS下方,將該行文字編輯為自訂的 table_prefix,並取消該行註解,然後儲存 (步驟 5),即可設定定義。


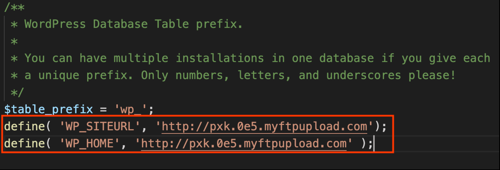
- 編輯 Siteurl 及 Home,使其和新 WordPress 網站使用的網域設定相符。在本範例中,我們使用設定帳戶時指定的臨時網域:'pxk.0e5.myftpupload.com'。按照您的帳戶情形使用合適的網域。
- Siteurl: define( 'WP_SITEURL', 'http://coolexample.com');
- Home:define( 'WP_HOME', 'http://coolexample.com');

注意:在
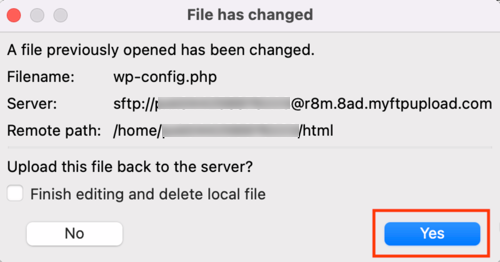
wp-config.php當中定義的 Siteurl 和 Home,只是在您準備好將網域指向這個新主機服務帳戶之前的臨時設定。 - 用您的編輯器儲存變更內容。FileZilla 將可偵測變更內容,並提示將檔案上傳至新網站。點選 FileZilla 內的「是」。

恭喜您!您已完成手動移動 WordPress 網站的程序。請參考以下相關步驟,將網域指向新的 WordPress 網站。
相關步驟
- WordPress 或 Managed Hosting for WordPress 方案使用者請點選管理員儀表板的「變更網域」連結,然後系統便會為您處理後續作業。

- 如果您的網域註冊於其他 GoDaddy 帳戶,則您需要找出 IP 位址,然後變更 A 記錄。